Infrastructure as Code with CloudFormation

DevOps/Cloud Engineer who loves learning, sharing knowledge and enjoys engaging with others on various topics.
Welcome to my Universe of Learning, where I transform complex ideas into simple forms.
My passion for sharing knowledge fuels my writing, making it accessible and fun.
Introduction
Before I began building CloudFormation templates for this project, I had never used it. I knew Terraform, but CloudFormation was new to me. So, before we get into the templates, I'd like to walk you through everything I learned about CloudFormation. If you're new to IaC, this section is for you.
If you're already familiar with CloudFormation, continue forward to the templates section. If not, stay here. This will save you lots of misunderstanding later.
What is CloudFormation?
CloudFormation is AWS's native infrastructure as code service. It allows you to describe your infrastructure in a file rather than clicking through the AWS Console.
Instead of:
Go to AWS Console → VPC → Create VPC → Fill out forms → Click Create.
You generate a file that says "create a VPC with these settings," and AWS will provision everything for you. That file is called a template and is written in YAML.
The Basic Structure
Every CloudFormation template follows this format
AWSTemplateFormatVersion: "2010-09-09"

Description: What this template does

Parameters:
  # Variables you can pass in

Resources:
  # The actual AWS resources you want to create
  # This is the only required section

Outputs:
  # Values you want to export after the stack is created
Resources: The Heart of Every Template
Every resource follows this exact pattern:
Resources:
  LogicalName:
    Type: AWS::Service::Resource
    Properties:
      PropertyOne: value
      PropertyTwo: value
LogicalName: a name you make up to reference this resource inside the template
Type: tells AWS what to create
Properties: the configuration for that resource
For example, when creating a VPC, you can write this:
Resources:
  MyVPC:
    Type: AWS::EC2::VPC
    Properties:
      CidrBlock: 10.0.0.0/16
      EnableDnsSupport: true
      EnableDnsHostnames: true
That is it. Three lines of properties, and AWS creates your VPC.
Parameters: Avoiding Hardcoded Values
Instead of hardcoding values like environment names or instance sizes, you use parameters:
Parameters:
  Environment:
    Type: String
    Default: dev
    AllowedValues:
      - dev
      - staging
      - prod

Resources:
  MyVPC:
    Type: AWS::EC2::VPC
    Properties:
      CidrBlock: 10.0.0.0/16
      Tags:
        - Key: Name
          Value: !Sub "${Environment}-vpc"
!Sub Substitutes the parameter value into the string. If the environment is dev, the tag becomes dev-vpc. If it is prod, it becomes prod-vpc. Same template, different environments.
The Four Functions You Will Use in Every Template
| Function | What it does | Example |
|---|---|---|
!Ref |
References a resource or parameter | !Ref MyVPC |
!GetAtt |
Gets a specific attribute of a resource | !GetAtt MyALB.DNSName |
!Sub |
Substitutes variables into a string | !Sub "${Environment}-vpc" |
!ImportValue |
Imports an output from another stack |
Connecting Resources
This is the most powerful feature of CloudFormation. Resources reference each other using !Ref and !GetAtt. This is how AWS knows to create them in the right order.
Resources:
  MyVPC:
    Type: AWS::EC2::VPC
    Properties:
      CidrBlock: 10.0.0.0/16

  MySubnet:
    Type: AWS::EC2::Subnet
    Properties:
      VpcId: !Ref MyVPC      # CloudFormation creates VPC first, then the subnet
      CidrBlock: 10.0.1.0/24
When CloudFormation sees !Refer MyVPC inside the subnet, it will automatically create the VPC before the subnet. You do not need to worry about the order.
Outputs: Sharing Values Between Stacks
Because this project divides infrastructure into many stacks, outputs represent how the stacks communicate with one another.
Outputs:
  VPCId:
    Description: The VPC ID
    Value: !Ref MyVPC
    Export:
      Name: !Sub "${Environment}-vpc-id"
Then in another stack:
Properties:
  VpcId: !ImportValue MyProject-vpc-id
Our Stack Structure for This Project
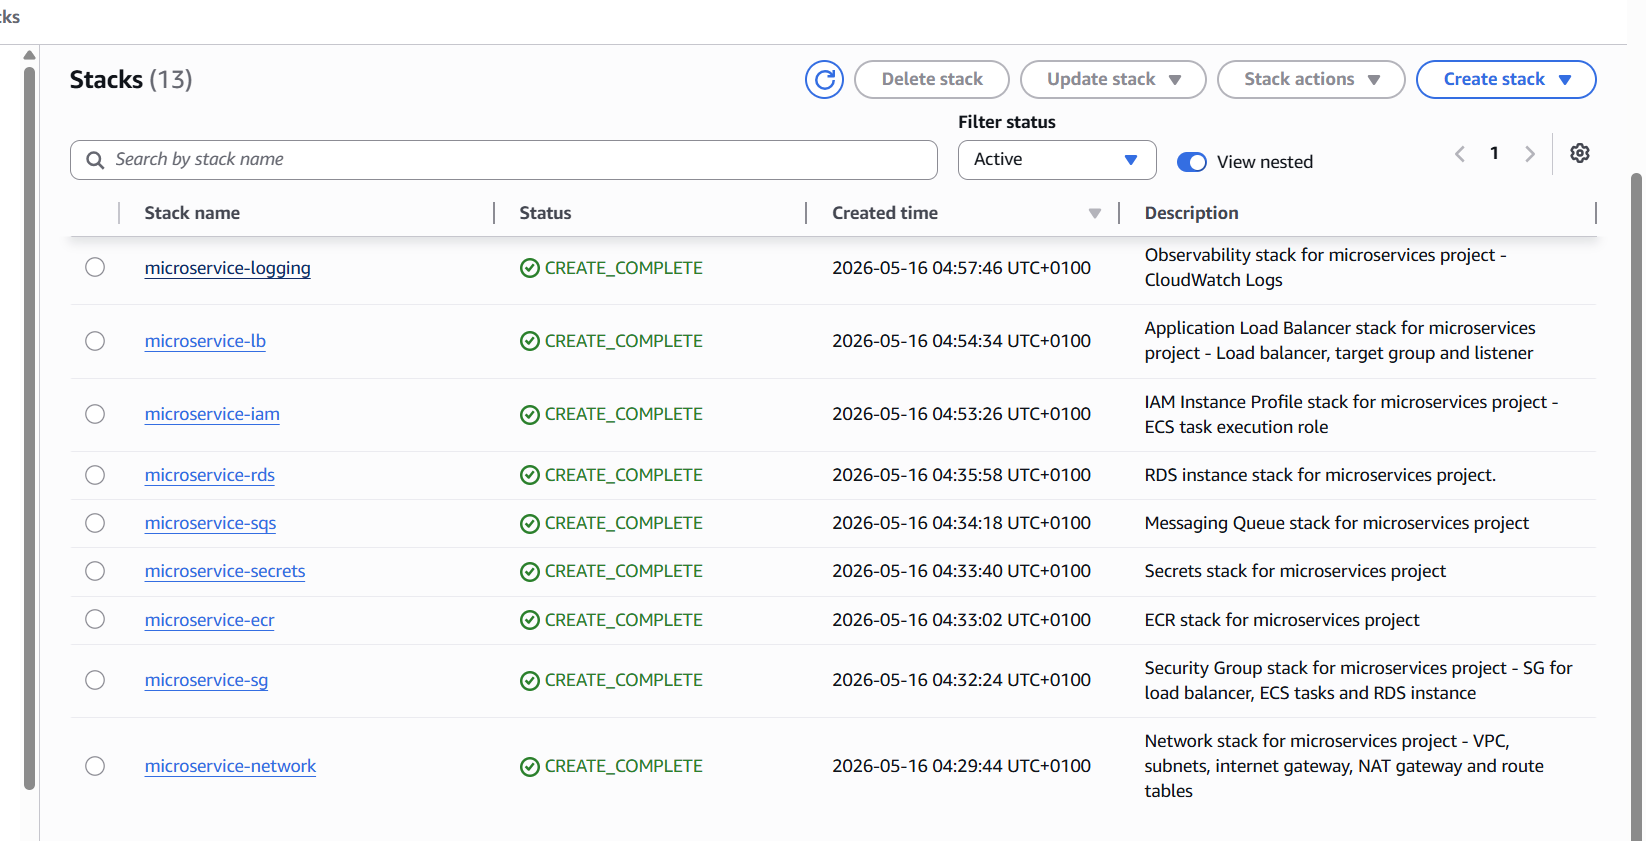
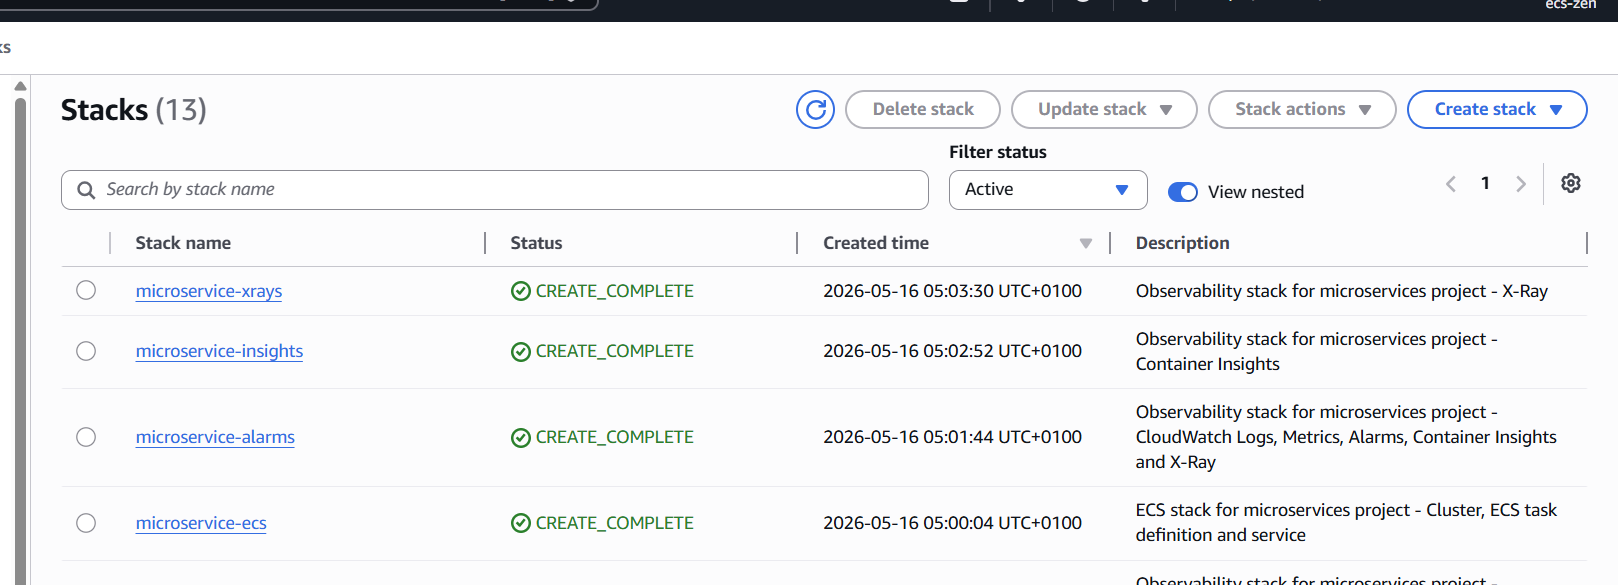
We are splitting the infrastructure into focused stacks that build on each other:
| Stack | Stack Name | Template File Name | What it creates |
|---|---|---|---|
| 1 | microservice-network | network.yaml |
VPC, subnets, internet gateway, NAT gateway, route table |
| 2 | microservice-sg | sg.yaml |
Security Groups for the application load balancer, ECS service, and RDS instance. |
| 3 | microservice-ecr | ecr.yaml |
ECR repositories for all 4services |
| 4 | microservice-rds | rds.yaml |
RDS PostgreSQL instances for 3 services |
| 5 | microservice-sqs | sqs.yaml |
SQS queue |
| 6 | microservice-iam | iam.yaml |
IAM policies for ECS tasks |
| 7 | microservice-ecs | ecs.yaml |
ECS cluster, ECS task definition, ECS Service |
| 8 | microservice-lb | lb.yaml |
ALB, API Gateway, WAF |
| 9 | microservice-loggings | logging.yaml |
CloudWatch, |
| 10 | microservice-alarms | alarms.yaml |
Alarms |
| 11 | microservice-insights | insights.yaml |
Container Insights |
| 12 | microservice-xrays | xrays.yaml |
X-ray |
Each stack exports values that the next stack imports.
Network Stack
This documentation can also be very useful in understanding how to create a VPC with the CloudFormation template.
Step 1: The Top Section
AWSTemplateFormatVersion: "2010-09-09"

Description: Network stack for microservices project - VPC, subnets, internet gateway, NAT gateway and security groups

Parameters:
  Environment:
    Type: String
    Default: dev
    AllowedValues:
      - dev
      - prod
    Description: Environment name used to tag and name all resources
What this does:
AWSTemplateFormatVersion: It is always the exact value; it never changes.Description: It describes what the stack does.Parameters: It is used to define one parameter calledEnvironment, so you can reuse this template for dev and prod.
Step 2: The VPC
Resources:

  VPC:
    Type: AWS::EC2::VPC
    Properties:
      CidrBlock: 10.0.0.0/16
      EnableDnsSupport: true
      EnableDnsHostnames: true
      Tags:
        - Key: Name
          Value: !Sub "${Environment}-vpc"
What this does:
Creates a VPC with IP range
10.0.0.0/16.EnableDnsSupportandEnableDnsHostnames.!Sub "${Environment}-vpc"— if Environment isdevthe VPC is nameddev-vpc
Another way to write this is:
Resources:

  VPC:
    Type: AWS::EC2::VPC
    Properties:
      CidrBlock: !Ref VpcCidr
      EnableDnsSupport: true
      EnableDnsHostnames: true
      Tags:
        - Key: Name
          Value: !Sub "${Environment}-vpc"
This is because it is better not to hardcode values. The CIDR block was referenced here. The CIDR block was stated in the parameter section; this means the parameter will become:
Parameters:
  Environment:
    Type: String
    Default: prod
    AllowedValues:
      - dev
      - prod
    Description: Environment name used to tag and name all resources

  VpcCidr:
  Type: String
  Default: 10.0.0.0/16
  Description: CIDR block for the VPC
Step 3: Internet Gateway
InternetGateway:
    Type: AWS::EC2::InternetGateway
    Properties:
      Tags:
        - Key: Name
          Value: !Sub "${Environment}-igw"

  AttachInternetGateway:
    Type: AWS::EC2::VPCGatewayAttachment
    Properties:
      VpcId: !Ref VPC
      InternetGatewayId: !Ref InternetGateway
What this does:
Creates an Internet Gateway: This is what connects your VPC to the internet
VPCGatewayAttachment: It attaches the gateway to your VPC. In the console, you do this manually; here, CloudFormation does it automaticallyNotice
!Ref VPCand!Ref InternetGateway: This is how resources reference each other
Step 4: Public Subnets Creation
PublicSubnet1:
    Type: AWS::EC2::Subnet
    Properties:
      VpcId: !Ref VPC
      CidrBlock: 10.0.1.0/24
      AvailabilityZone: !Select [ 0, !GetAZs "" ]
      MapPublicIpOnLaunch: true
      Tags:
        - Key: Name
          Value: !Sub "${Environment}-public-subnet-1"

  PublicSubnet2:
    Type: AWS::EC2::Subnet
    Properties:
      VpcId: !Ref VPC
      CidrBlock: 10.0.2.0/24
      AvailabilityZone: !Select [ 1, !GetAZs "" ]
      MapPublicIpOnLaunch: true
      Tags:
        - Key: Name
          Value: !Sub "${Environment}-public-subnet-2"
What this does:
Creates two public subnets in two different availability zones. This is required for the ALB.
!Select [ 0, !GetAZs "" ]: It automatically picks the first available AZ in your region. You do not hardcodeeu-central-1a. This makes the template work in any regionMapPublicIpOnLaunch: true: It makes sure anything launched in this subnet gets a public IP automatically.
Step 5: Private Subnets creation
PrivateSubnet1:
    Type: AWS::EC2::Subnet
    Properties:
      VpcId: !Ref VPC
      CidrBlock: 10.0.3.0/24
      AvailabilityZone: !Select [ 0, !GetAZs "" ]
      Tags:
        - Key: Name
          Value: !Sub "${Environment}-private-subnet-1"

  PrivateSubnet2:
    Type: AWS::EC2::Subnet
    Properties:
      VpcId: !Ref VPC
      CidrBlock: 10.0.4.0/24
      AvailabilityZone: !Select [ 1, !GetAZs "" ]
      Tags:
        - Key: Name
          Value: !Sub "${Environment}-private-subnet-2"
What this does:
Same as public subnets but no
MapPublicIpOnLaunch. These resources here have no public IP.Your ECS tasks and RDS databases will live here because they should never be directly accessible from the internet
Step 6: NAT Gateway
NATGatewayEIP1:
    Type: AWS::EC2::EIP
    Properties:
      Domain: vpc

  NATGateway1:
    Type: AWS::EC2::NatGateway
    Properties:
      AllocationId: !GetAtt NATGatewayEIP.AllocationId
      SubnetId: !Ref PublicSubnet1
      Tags:
        - Key: Name
          Value: !Sub "${Environment}-nat-gateway"
What this does:
EIP: The elastic IP address, a fixed public IP that gets attached to the NAT GatewayNATGateway: It sits in the public subnet and allows private subnet resources to reach the internet without being directly exposed. Your ECS tasks need this to pull Docker images from ECR!GetAtt NATGatewayEIP.AllocationId: It gets the allocation ID of the EIP we just created
Step 7: Route Tables Creation
PublicRouteTable:
    Type: AWS::EC2::RouteTable
    Properties:
      VpcId: !Ref VPC
      Tags:
        - Key: Name
          Value: !Sub "${Environment}-public-rt"

  PublicRoute:
    Type: AWS::EC2::Route
    Properties:
      RouteTableId: !Ref PublicRouteTable
      DestinationCidrBlock: 0.0.0.0/0
      GatewayId: !Ref InternetGateway

  PublicSubnet1RouteTableAssociation:
    Type: AWS::EC2::SubnetRouteTableAssociation
    Properties:
      SubnetId: !Ref PublicSubnet1
      RouteTableId: !Ref PublicRouteTable

  PublicSubnet2RouteTableAssociation:
    Type: AWS::EC2::SubnetRouteTableAssociation
    Properties:
      SubnetId: !Ref PublicSubnet2
      RouteTableId: !Ref PublicRouteTable

  PrivateRouteTable1:
    Type: AWS::EC2::RouteTable
    Properties:
      VpcId: !Ref VPC
      Tags:
        - Key: Name
          Value: !Sub "${Environment}-private-rt"

  PrivateRoute1:
    Type: AWS::EC2::Route
    Properties:
      RouteTableId: !Ref PrivateRouteTable
      DestinationCidrBlock: 0.0.0.0/0
      NatGatewayId: !Ref NATGateway

  PrivateSubnet1RouteTableAssociation:
    Type: AWS::EC2::SubnetRouteTableAssociation
    Properties:
      SubnetId: !Ref PrivateSubnet1
      RouteTableId: !Ref PrivateRouteTable
What this does:
The public route table sends all traffic (
0.0.0.0/0) through the Internet Gateway.The private route table sends all traffic through the NAT Gateway instead.
Associations connect each subnet to its route table.
Step 8: Output Section
Outputs:
  VPCId:
    Value: !Ref VPC
    Export:
      Name: !Sub "${Environment}-vpc-id"

  PublicSubnet1Id:
    Value: !Ref PublicSubnet1
    Export:
      Name: !Sub "${Environment}-public-subnet-1-id"

  PublicSubnet2Id:
    Value: !Ref PublicSubnet2
    Export:
      Name: !Sub "${Environment}-public-subnet-2-id"

  PrivateSubnet1Id:
    Value: !Ref PrivateSubnet1
    Export:
      Name: !Sub "${Environment}-private-subnet-1-id"

  PrivateSubnet2Id:
    Value: !Ref PrivateSubnet2
    Export:
      Name: !Sub "${Environment}-private-subnet-2-id"
What this does:
Exports all the IDs that every other stack will need.
Every subsequent stack — ECS, RDS, ALB — will import these values using
!ImportValue
To deploy, run this command
aws cloudformation deploy \
  --template-file network.yaml \
  --stack-name microservice-network \
  --capabilities CAPABILITY_NAMED_IAM \
  --parameter-overrides Environment=dev
network.yamlis the name of the template file. You can give yours any name.microservice-networkis the name of the network stack.
Security Group Stack
AWSTemplateFormatVersion: "2010-09-09"

Description: Security Group stack for microservices project - SG for load balancer, ECS tasks and RDS instance

Parameters:
  Environment:
    Type: String
    Default: dev
    AllowedValues:
      - staging
      - dev
      - prod
    Description: Environment name used to tag and name all resources

  loadBalancerPort:
    Type: Number
    Default: 80
    Description: Port for load balancer to listen on

  RDSPort:
    Type: Number
    Default: 5432
    Description: Port for RDS instance to listen on

  ECSTaskFromPort:
    Type: Number
    Default: 3001
    Description: Port for ECS tasks to listen on

  ECSTaskToPort:
    Type: Number
    Default: 3004
    Description: Port for ECS tasks to listen on

Resources:
  LoadBalancerSG:
    Type: AWS::EC2::SecurityGroup
    Properties:
      GroupDescription: Security group for load balancer
      VpcId: !ImportValue
        Fn::Sub: "${Environment}-vpc-id"
      SecurityGroupIngress:
        - IpProtocol: tcp
          FromPort: !Ref loadBalancerPort
          ToPort: !Ref loadBalancerPort
          CidrIp: 0.0.0.0/0
      Tags:
        - Key: Name
          Value: !Sub "${Environment}-lb-sg"

  ECSTaskSG:
    Type: AWS::EC2::SecurityGroup
    Properties:
      GroupDescription: Security group for ECS tasks
      VpcId: !ImportValue
        Fn::Sub: "${Environment}-vpc-id"
      SecurityGroupIngress:
        - IpProtocol: tcp
          FromPort: !Ref ECSTaskFromPort
          ToPort: !Ref ECSTaskToPort
          SourceSecurityGroupId: !Ref LoadBalancerSG
      Tags:
        - Key: Name
          Value: !Sub "${Environment}-ecs-sg"

  RDSSG:
    Type: AWS::EC2::SecurityGroup
    Properties:
      GroupDescription: Security group for RDS instance
      VpcId: !ImportValue
        Fn::Sub: "${Environment}-vpc-id"
      SecurityGroupIngress:
        - IpProtocol: tcp
          FromPort: !Ref RDSPort
          ToPort: !Ref RDSPort
          SourceSecurityGroupId: !Ref ECSTaskSG
      Tags:
        - Key: Name
          Value: !Sub "${Environment}-rds-sg"
This stack follows the same method as the network stack. The only difference is that it receives imported values from the network stack.
These imported values can be written in two ways:
If the output was written like this:
Outputs:
  VPCId:
    Value: !Ref VPC
    Export:
      Name: "VpcID"
It would have been referenced like this VpcId: !ImportValue VPCId in the sg.yaml template. This is because the export name is known.
In the outputs section in the network.yaml template, the export name is not known.
Outputs:
  VPCId:
    Value: !Ref VPC
    Export:
      Name: !Sub "${Environment}-vpc-id"
This is why it was referenced this way in sg.yaml
      VpcId: !ImportValue
        Fn::Sub: "${Environment}-vpc-id"
The sg.yaml template was deployed by running this command:
aws cloudformation deploy \
  --template-file sg.yaml \
  --stack-name microservice-sg \
  --capabilities CAPABILITY_NAMED_IAM \
  --parameter-overrides Environment=dev
Note: Only the template-file and stack-name changed when running the command to deploy sg.yaml script.
To find other resource documentation, browse CloudFormation documentation on your favourite search engine.
To see other templates for the different parts of the architecture, check my GitHub.
Using a Bash Script as a Command Centre
When I was done writing CloudFormation templates for this project, I quickly realized I had twelve separate template files to deploy. Running 12 individual commands every time I wanted to set up the infrastructure was impractical. I needed one command that could handle everything.
How It Works
The script holds a simple list that maps each template file to its stack name:
STACKS=(
  "network.yaml:microservice-network"
  "sg.yaml:microservice-sg"
  "sqs.yaml:microservice-sqs"
  "iam.yaml:microservice-iam"
  # ...and so on
)
Then it loops through the list and runs the CloudFormation deploy command automatically, replacing the template file and stack name each time:
for entry in "${STACKS[@]}"; do
  TEMPLATE=\((echo \)entry | cut -d: -f1)
  STACK=\((echo \)entry | cut -d: -f2)

  aws cloudformation deploy \
    --template-file $TEMPLATE \
    --stack-name $STACK \
    --capabilities CAPABILITY_NAMED_IAM \
    --parameter-overrides Environment=$ENV
done
The order of the list is intentional. The stack that other stacks depend on always appears higher up. If any stack fails, the script stops immediately, so you never deploy on top of a broken foundation.
One Command to Rule Them All
To deploy the entire infrastructure to a dev environment, run:
./deploy.sh dev
To deploy to production:
./deploy.sh prod
That single command deploys all thirteen stacks in the correct order to the correct environment.
Also, to destroy the entire architecture, as this is a project, run:
./destroy.sh dev
or
./destroy.sh prod
Other Commands You Should Know That Can Be Helpful
When you are deploying CloudFormation stacks, things will not always go smoothly. These two tools became essential parts of my debugging process throughout this project.
1. describe-stack-events
When a stack deployment fails, the first command you should run is:
aws cloudformation describe-stack-events \
  --stack-name your-stack-name \
  --query 'StackEvents[?ResourceStatus==`CREATE_FAILED`].[LogicalResourceId,ResourceStatusReason]' \
  --output table or --output text
Note: I found --output text easier to scan through
This filters through all the deployment events and shows you only the resources that failed and the exact reason they failed. Without the --query filter, every single event from the deployment is returned. The filter narrows it down to just what matters.
If the filtered command returns nothing, which happened to me several times, run the full output instead:
aws cloudformation describe-stack-events \
  --stack-name your-stack-name \
  --output text
This happens when the failure occurs before any resource is created, which brings me to the second tool.
2. cfn-lint
Some CloudFormation errors happen so early in the deployment process that describe-stack-events returns nothing at all. I experienced this with my RDS stack. I kept getting this error:
microservice-rds FAILED
The following hook(s)/validation failed: [AWS::EarlyValidation::PropertyValidation].
To troubleshoot Early Validation errors, use the DescribeEvents API for detailed failure information.
I ran every AWS debugging command I knew. It either returned nothing or repeated the same message. I spent an entire day going in circles, deleting the stack, fixing what I thought was wrong, redeploying, and hitting the same wall.
Then I came across cfn-lint. This is a tool that validates your CloudFormation templates locally before you even touch AWS. I installed it and ran it against my template:
# Validate a single template
cfn-lint rds.yaml

# Validate all templates at once
cfn-lint *.yaml
The problem showed up immediately. What had taken me a full day of back and forth with AWS commands was identified in seconds by running one local command.
I now run cfn-lint on every template before deploying. It is the infrastructure equivalent of running a spell checker before sending an important email, and it costs nothing and saves you hours.
The difference between describe-stack-events, and cfn-lint is this:
describe-stack-events  → tells you something went wrong during deployment
cfn-lint               → catches problems before deployment even starts
Use both. Run cfn-lint first to catch template errors locally, then use describe-stack-events to investigate anything that fails at runtime.
Screenshots of stacks on CloudFormation
Conclusion
Infrastructure as code is not just about automating deployments. It is about making your infrastructure readable, reviewable, and reproducible. A CloudFormation template is a document that describes exactly what exists in your AWS account and why. Anyone who reads it should be able to understand your architecture without logging into the console.